Further information can be found [here in the Astroshop magazine](https://www.astroshop.eu/magazine/information/telescope-information/the-components-in-a-telescope/tripod/i,1093).
# 🇬🇧 Connection between Mount and Tripod or Pier The connections between telescope tripods and mounts have simply evolved over time. There are no fixed standards, but at least quite similar dimensions are used across different brands for similarly constructed mounts. ### GP- / EQ5 Connection This connection originates from the Vixen **G**reat **P**olaris mount and was adopted by Skywatcher for their EQ5 mount. Similarly sized mounts from many other brands also use this design. However, the dimensions can be slightly different between manufacturers, and even between different batches from the same manufacturer. Therefore, it is difficult to state universally valid dimensions. A good overview [can be found here](https://www.google.com/url?source=gmail&sa=E&q=https://www.bloomingstars.com/adapting-a-sturdy-wooden-tripod-from-a-to-an-eq-6-mount/) (English). The connection **mostly** fits these mounts: Omegon - Twinmaster, - EQ-500 X, - Half-pier for Kolossus, Skywatcher - EQ-3, - (H)EQ-5, - AZ/EQ-5, - Skytee, Bresser and Explore Scientific EXOS-2, Celestron AVX, Meade LX85, Vixen GP / GP-DX.Current Vixen mounts have a different connection than GP, see below!
### EQ6 Connection With the EQ6 mount, Skywatcher retained the shape but slightly changed the dimensions so that the connection between the tripod and the mount is also suitable for higher load capacities. The EQ6 connection **mostly** fits: - Skywatcher (AZ-)EQ-6(R), - Celestron CGEM. ### 3/8" Photo Thread Connection Especially lighter mounts can have a central 3/8"-16 UNC thread. It has a 9.5mm diameter - please do not confuse it with the M10 thread: the pitch of the threads is different. If you screw a photo screw into an M10 thread, you can easily damage both!Light photo tripods are **not** suitable for telescope mounts!
For a photo tripod to be used as a telescope tripod, it must: 1. Be designed for significantly more load capacity than is mounted on it. This is because a telescope has much more leverage than a camera and needs to be aligned more precisely. 2. Have enough contact surface area - we recommend at least 8cm in diameter.Modern "strainwave" mounts often have a 3/8" thread. However, they are almost always meant to be connected to their dedicated tripods with other screws or clamps. Therefore, always check the connections very carefully when combining devices. Above all, the mount must be secured against rotating loosely on the tripod. This can easily happen if the telescope is turned by hand or you accidentally bump into it.
### Manufacturer- and Device-Specific Connections Particularly high-capacity mounts are almost always equipped with proprietary tripod connections. However, there are adapters for the more common mounts and tripods. Tripods and mounts of the same brand do not necessarily have to fit together! The reason is that mounts for heavier loads require a much more stable connection - which would be oversized for a small mount. # 🇬🇧 Rotators in general This instrument, also called a "field rotator," is attached between the focuser and the camera. It allows you to rotate the image. Please note the following: ### Compatible connection There are various thread types for screwing it on. Metric fine threads can have different pitches. The external threads usually point towards the camera, the internal threads towards the telescope lens – but there can be exceptions! It's best to check the technical specifications and dimensional drawings. If you are unsure, please ask. ### Sufficient optical length How much travel is left at the focuser when you have focused your camera without the rotator? The rotator must be optically shorter than the remaining focusing distance. Example: Without a rotator, your focuser is extended by 17 mm when the camera is focused at infinity. In this case, you can use a rotator with a 14 mm optical length. However, a rotator with a 20 mm optical length will not work. Remember to take into account the length of any adapter rings that may be required. ### Clamping Screws One or more locking screws are used on manual rotators to fix the set position. Do not overtighten the screws, otherwise they may be difficult to loosen again due to temperature fluctuations. ### Secure Connection When turning the accessory connected to the rotator, it is best to do so clockwise. Turning it counterclockwise could inadvertently loosen the connection between the rotator and the accessory. This is more likely at lower temperatures because the lubricant in the rotator may be more viscous.In astrophotography, you always need new flat frames when you have rotated the rotator to a new orientation.
# 🇬🇧 Astro photography # 🇬🇧 Guiding Aids Motorized astronomical mounts track the celestial rotation, allowing the telescope to remain pointed at a set object for hours. For this to work, the mount must be precisely aligned. For instance, the polar axis (or hour axis) of an equatorial mount must point as accurately as possible toward the celestial pole. However, in astrophotography, simply aligning the mount as accurately as possible is not enough. Depending on the exposure time, mechanical inaccuracies in the mount become noticeable. The longer the desired exposure, the more pronounced these effects are. The mount's tracking must be constantly monitored and corrected. For this, **guiding aids** such as a guide scopes with guide scope rings or an off-axis guider are required. If the mount's correction is performed automatically, it is called **autoguiding**. This requires a camera and a control system that constantly sends impulses to the mount. Suitable cameras can be found [here](https://www.astroshop.eu/astrophotography/cameras/astronomical-cameras/15_35_10_10/a,Zubehoer.Anwendungsgebiete=Autoguider) in the Astro Cameras category. # 🇬🇧 Guidescopes To ensure that an astronomical mount remains precisely aligned with a set object, the tracking must be controlled. This control can be done using a small telescope mounted parallel to the main telescope. This small telescope is called a **guidescope**. In contrast to a standard finder scope, guidescopes allow the attachment of a camera. This makes the tracking control process known as **autoguiding** possible. Guidescopes can also be used as finder scopes, though the necessary eyepiece is usually not included in the delivery.The focus point of guidescopes is generally set so that cameras with a flange focal distance (back focus) of up to 2 cm can be used. For use as a finder scope, this means it is usually not possible to use a star diagonal or an erecting prism between the guidescope and the eyepiece.
Guidescopes are typically attached to the telescope's finder bracket ("finder shoe"); guidescope rings are used for this purpose. # 🇬🇧 Guide Scope Rings [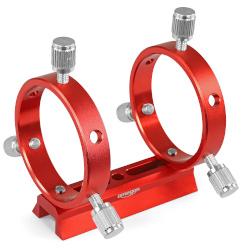](https://bookstack.astroshop.de/uploads/images/gallery/2026-01/scaled-1680-/86763-bookstackapp.jpg)If you want to mount a guide scope parallel to your telescope for **guiding in astrophotography**, guide scope rings are the simplest solution. The guide scope rings are attached either directly to the main tube rings or—even better—to the main instrument using a dovetail bar. The adjustment screws on guide scope rings should be fitted with a **plastic tip** to prevent scratching your guide scope. Follow these steps to align the telescope and the guide scope parallel to each other: 1. Set up the telescope, including the main camera, during the day and aim at a very distant landmark. This could be a spire or something similar. The target should be at least one kilometer away. 2. Adjust the screws on the guide scope rings so that the setup looks as symmetrical as possible. Tighten the screws hand-tight. Connect the guiding camera. 3. Point the telescope at this target and turn off the tracking (if motorized). 4. Verify that the target is centered in the main telescope. Tip: Many camera control programs allow you to overlay a crosshair. 5. Switch from the live view of the main camera to the live view of the guiding camera. 6. Only now should you begin to move the screws on the guide scope rings. We recommend starting with only the screws on the front or rear ring. 7. Loosen one of the screws slightly. It should not be more than a half turn, as the guidescope could become too loose otherwise. Observe whether the target moves closer to the center. 1. If not, tighten the screw again and move to the next screw. 2. If it does move closer, tighten the other two screws hand-tight and move to the next screw. 8. Continue this process until the target is centered in both the main camera and the guiding camera.It is not necessary for the guidescope to be pedantically accurate in its alignment. Guiding still works very well even if the axes of the two optics deviate slightly from one another.
The fields of view of the two cameras may be rotated relative to each other. However, for the purpose of adjusting the guidescope axis, it helps greatly if the fields of view have the same orientation.
# 🇬🇧 Herschel prism ### How it Works A Herschel wedge, also called a Herschel prism, is a special filter for observing the sun. It has many advantages over a lens filter, but can only be used with refracting telescopes. In conjunction with a telescope, a Herschel wedge provides detailed images of the sun's photosphere. Sunspots, faculae, and granulation can be observed and photographed. The Herschel wedge should not be used with reflecting telescopes, as the secondary mirror could overheat and be damaged. At approximately 4%, the light intensity reaching the eyepiece is still too strong for visual observation of the sun to avoid eye damage. Therefore, the remaining amount must be reduced using a neutral density (ND) filter with a density of 3.0. In combination with a polarizing filter, the amount of light can be continuously adjusted. For photography, lower density neutral density filters can be used to keep the exposure time short. (Source: [https://de.wikipedia.org/wiki/Herschelkeil](https://de.wikipedia.org/wiki/Herschelkeil) / License ["Creative Commons Attribution-ShareAlike"](https://creativecommons.org/licenses/by-sa/4.0/deed.de)) [](https://bookstack.astroshop.de/uploads/images/gallery/2025-12/Ykpimage.png) 1. Glass body of the Herschel wedge 2. Neutral density filter 3. Eyepiece 4. Polarizing filter Image Source: By Tamasflex - Own work, CC BY-SA 3.0, [https://commons.wikimedia.org/w/index.php?curid=15738848](https://commons.wikimedia.org/w/index.php?curid=15738848) ### Usage Instructions Caution is always necessary when observing the sun. Burns and injuries can happen quite easily. This is especially true with Herschel prisms, because the telescope does not carry a lens filter when using them. Because sunlight enters the telescope unimpeded, we only recommend Herschel prisms: - for refractor telescopes (lens telescopes) - without internal plastic components and - with objective lens diameters up to 150 mm. #### Precautions/Safety Instructions - **Before** each movement, consider whether it might concentrate too much light onto body parts or materials. - **Never** leave a telescope pointing at the sun unattended. - Before attaching or removing the Herschel prism from the telescope, swivel the telescope away from the sun. - If you have a finder scope, attach a solar filter or its lens cap. This also applies if you have multiple telescopes or optics mounted in parallel. - If you pause observing for an extended period, put a lens cap on the objective lens or swivel the telescope away from the sun. - **Always leave the neutral density filter attached** to the Herschel prism. For **visual** observation, always use an **additional polarizing filter** or other filter with a similar attenuation effect. - Ensure that the Herschel prism is **securely clamped** in the focuser. If it should happen to fall out, do not stay behind the focuser. - Do not use flatteners, reducers, or similar devices. These could overheat. - Check periodically whether the telescope and the Herschel wedge are unusually warm. If so, move the telescope away from the sun. - Do **not screw filters in front** of the Herschel prism! Always screw color filters or similar filters into the eyepiece or camera that is connected to the Herschel prism. When photographing through a Herschel prism, the image may appear too bright, even if the polarizing filter is set to maximum attenuation. In this case, you will need another filter between the Herschel prism and the camera. #### Applications You can use a Herschel prism very effectively with a binocular viewer. Binocular vision makes many details on the sun much clearer. Color filters can increase contrast. Try red or green filters. For **photography**, you can connect a camera directly. For focal photography, a planetary camera and the "lucky imaging" method are recommended. Digital SLR cameras can also be used, but focusing can easily fail with them, as the focuser on many refractors cannot be retracted far enough. In such cases photography using eyepiece projection is usually possible. # 🇬🇧 Cables and power supplies in general https://www.astroshop.eu/telescope-accessories/cables-power-supplies/15\_97 # 🇬🇧 Handling lithium-ion batteries DANGER! Lithium-ion cells can get hot or ignite and cause serious injury when exposed to extreme conditions. Do not connect the positive and negative poles of the battery with metal objects (e.g. wire). Only use approved LiFePO-4 chargers Be especially careful while wearing necklaces, rings, bracelets, hairpins, or other metal objects. Do not puncture, hit, or step on the battery. Do not immerse the battery in liquid and avoid moisture. Do not use a LiFePO4 battery with other types of batteries. Do not connect the battery to an alternator or non-electronically controlled charging system (except when using a voltage regulator). Do not smoke next to the battery. Be careful not to let heavy objects fall on the battery. Keep it away from children. Do not store it in or in the near fire, on stoves or on other Places with high temperatures. Do not expose it to direct sunlight or use/store the battery in cars in hot weather. Otherwise, the battery may release heat or ignite. This use may also result in loss of performance and shortened lifespan. Do not disassemble or modify the battery. The battery is equipped with safety and protection devices that, if damaged, could cause the battery to become hot, explode or ignite. Stop using the battery immediately if it emits an unusual odor, becomes hot, changes color or shape, or otherwise appears unusual during use, charging, or storage. Do not insert the battery intoMicrowave oven, a high pressure container or on induction hotplates. Check it regularly for damage, cracks and corrosion on the connections. Do not use it if you notice any damage. The terminals can always be live, so do not place metal objects on a Li-ion battery. Avoid short circuits, deep discharges and high charging currents. Use tools with insulated handles. When working with the battery, avoid wearing any metal objects, e.g. watches, bracelets, rings, etc. If the battery burns, you must use a Type D foam or CO2 fire extinguisher to extinguish it. Do not open or disassemble the battery. Electrolyte is highly corrosive. Under normal conditions contact with it is impossible. If the case is damaged, do not touch exposed electrolyte or powder as it is corrosive. Li-ion batteries can become projectiles in an accident due to their large mass. Always ensure secure attachment Transport it carefully as Li-ion batteries are sensitive to mechanical shock. Before use, check whether the battery emits noises that indicate a defect. Do not use the battery if it crackles, hisses or anything similarSounds can be heard – there is a risk of fire. Use good quality and correct size cables.Battery cables must be crimped, preferably soldered. Solder connections alone are not sufficient. UL listed battery cables are recommended. ### General safety instructions {{@106}} ### Disposal instructions for batteries {{@107}}