| **Product ID** | **Focal length** | **Aperture** | **Focal ratio** | **Objective thread** | **Tube length x diameter** | **Width x Height at focuser** | **Focuser travel** | **Connections on focuser** |
|---|---|---|---|---|---|---|---|---|
| 86594, **86816** | 200mm | 45mm | f/4.5 | M48x0.75 inner thread | 210mm x 50.8mm | 78.2mm x 67 mm | 35mm | 1.25” clamp + M42x0.75 (T2) outer thread |
| 86595, **86817** | 250mm | 45mm | f/5.6 | 260mm x 50.8mm | 35mm |
In the **“ringed” version (product ID in italics above)**, the FlexiSpeed Guidescope comes as a bundle with the Guidescope Rings 60mm. For their usage, please refer to the separate instructions there.
# Autoguiding basics Motorized astronomical mounts track the celestial rotation, allowing the telescope to remain pointed at a set object for hours. For this to work, the mount must be precisely aligned. For instance, the polar axis (or hour axis) of an equatorial mount must point as accurately as possible toward the celestial pole. However, in astrophotography, simply aligning the mount as accurately as possible is not enough. Depending on the exposure time, mechanical inaccuracies in the mount become noticeable. The longer the desired exposure, the more pronounced these effects are. The mount's tracking must be constantly monitored and corrected. For this, **guiding aids** such as a guide scopes with guide scope rings or an off-axis guider are required. If the mount's correction is performed automatically, it is called **autoguiding**. This requires a camera and a control system that constantly sends impulses to the mount. Suitable cameras can be found [here](https://www.astroshop.eu/astrophotography/cameras/astronomical-cameras/15_35_10_10/a,Zubehoer.Anwendungsgebiete=Autoguider) in the Astro Cameras category. To ensure that an astronomical mount remains precisely aligned with a set object, the tracking must be controlled. This control can be done using a small telescope mounted parallel to the main telescope. This small telescope is called a **guidescope**. In contrast to a standard finder scope, guidescopes allow the attachment of a camera. This makes the tracking control process known as **autoguiding** possible. Guidescopes can also be used as finder scopes, though the necessary eyepiece is usually not included in the delivery.The focus point of guidescopes is generally set so that cameras with a flange focal distance (back focus) of up to 2 cm can be used. For use as a finder scope, this means it is usually not possible to use a star diagonal or an erecting prism between the guidescope and the eyepiece.
Guidescopes are typically attached to the telescope's finder bracket ("finder shoe"); guidescope rings are used for this purpose. # Setup ### Changing the tube length Do you want to use the FlexiSpeed guide scope as a finder or a small spotting scope? Then you have to **unscrew a tube segment or two.** That way you can work with a star diagonal or Amici prism and eyepiece. The segments are simply connected by an M48 \* 0.75mm thread. ### Attaching filters or a dew shield The objective also has an M48 thread: you can screw in filters or use an M48 extension tube as a dew shield. ### Using guide scope rings [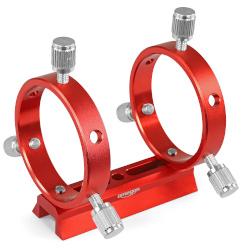](https://bookstack.astroshop.de/uploads/images/gallery/2026-01/scaled-1680-/86763-bookstackapp.jpg)If you want to mount a guide scope parallel to your telescope for **guiding in astrophotography**, guide scope rings are the simplest solution. The guide scope rings are attached either directly to the main tube rings or—even better—to the main instrument using a dovetail bar. The adjustment screws on guide scope rings should be fitted with a **plastic tip** to prevent scratching your guide scope. Follow these steps to align the telescope and the guide scope parallel to each other: 1. Set up the telescope, including the main camera, during the day and aim at a very distant landmark. This could be a spire or something similar. The target should be at least one kilometer away. 2. Adjust the screws on the guide scope rings so that the setup looks as symmetrical as possible. Tighten the screws hand-tight. Connect the guiding camera. 3. Point the telescope at this target and turn off the tracking (if motorized). 4. Verify that the target is centered in the main telescope. Tip: Many camera control programs allow you to overlay a crosshair. 5. Switch from the live view of the main camera to the live view of the guiding camera. 6. Only now should you begin to move the screws on the guide scope rings. We recommend starting with only the screws on the front or rear ring. 7. Loosen one of the screws slightly. It should not be more than a half turn, as the guidescope could become too loose otherwise. Observe whether the target moves closer to the center. 1. If not, tighten the screw again and move to the next screw. 2. If it does move closer, tighten the other two screws hand-tight and move to the next screw. 8. Continue this process until the target is centered in both the main camera and the guiding camera.It is not necessary for the guidescope to be pedantically accurate in its alignment. Guiding still works very well even if the axes of the two optics deviate slightly from one another.
The fields of view of the two cameras may be rotated relative to each other. However, for the purpose of adjusting the guidescope axis, it helps greatly if the fields of view have the same orientation.
# Focusing and Connection of Guiding Camaras The Rack and Pinion Focusers of the FlexiSpeed Guidescopes allow high focus accuracy. A focusing stroke scale is convenient to find and record the focus position. Most common guiding cameras can simply be inserted into the focuser. We recommend to bring them roughly in focus in daytime already. Therefore, point the guide scope to a very distant object (at least several hundred meters). Insert the camera and connect it to your imaging software. Use the video stream to focus. Note the position of the focuser or use the locking screw on the focuser. In the evening or night, you can then do the fine focusing. Therefore, point the guide scope to a bright star so you have enough signal for the video stream again.You do not have to focus your guiding camera perfectly. If you have a sensitive sensor, you might be able to reach exposure times below 0.5 seconds. In this case, a slightly defocused image can even help. That is because atmospheric seeing can displace stars on the sensor. This could be "misunderstood" as tracking errors, so that unnecessary corrections are carried out. A slightly defocused star will not suffer from seeing as much as a perfectly focused star.
If focusing is impossible, there are two reasons and solutions: 1. The camera sensor is **inward** of the focusing plane → You have to slide the camera away from the objective. This can often be reached by simply not inserting the camera fully. Be careful, you should at least insert a guiding camera 20mm wide into the focuser. It is also possible to use a 1.25mm or T2 extension tube. 2. The camera sensor is **outward** of the focusing plane → You have to move it nearer to the objective. To achieve this, you can disassemble the tube because it consists of one 70mm and one or two 50mm long segments. These parts are threaded together. Take out one 50mm segments and you should be fine. Sometimes the camera sensor might now end up being inward of the focus. In this case just proceed like above.If you want to use the guidescope with an eyepiece, **as a finder scope**, you can make use of the segments as well: With only an eyepiece attached in straight line, you should be able to focus out of the box. If not, or if you want to use a star diagonal, simply take out one or two segments as well.
# Preventing fogging Often humidity condensates throughout the night. To keep the dew off, we recommend: 1. You can use an M48 extension to extend the objective lens mount. That keeps humid air off the lens and reflects thermal radiation from the lens back to itself. Take at least a 30mm long extension. This will keep dew off for a while, but likely not for the whole night. 2. To safely prevent dew, attach a heater strap around the lens mount. A short strap of 11 or 15cm length and a few watts electrical power is enough. # Security Solar Warning: Never look at the sun with the device. Risk of permanent eye damage or even blindness. # Copyright/Impressum 🇬🇧 Reproduction of the contents of this document in whole or in part outside of private use is expressly prohibited in any form. Changes and errors excepted. All texts, images and characters are the property of NIMAX GmbH. 🇩🇪 Die vollständige oder teilweise Vervielfältigung der Inhalte dieses Dokuments außerhalb des privaten Gebrauchs ist in jeder Form ausdrücklich verboten. Änderungen und Irrtümer vorbehalten. Alle Texte, Bilder und Zeichen sind Eigentum der NIMAX GmbH. 🇫🇷 La reproduction, intégrale ou partielle, du contenu de ce document à des fins autres que privées est formellement interdite. Sous réserve de modifications et d'erreurs. Tous les textes, images et marques déposées sont la propriété de NIMAX GmbH. **NIMAX GmbH** Otto-Lilienthal-Str. 9 86899 Landsberg am Lech Geschäftsführer / directors / Directeurs: Dominik Schwarz, Ben Schwarz, Patrick Bosch Handelsregistereintrag / N° Registre du commerce: HRB 21932 - Amtsgericht Augsburg Ust.-Id. / N° d'identification TVA: DE250000378 ElektroG Reg.Nr.: DE 95429205 Batt-Reg.-Nr.: DE 94266517 WEEE Nr.: 95429205 Verantwortlich gemäß § 18 Abs. 2 MStV / Directeur de la publication: Ben Schwarz, NIMAX GmbH, Adresse wie oben.